How to Take DSLR-Like Photos with an iPhone (Pro Tips and Settings Guide)
iPhone cameras have become powerful enough to replace traditional cameras for most everyday photography. But getting DSLR-like photos isn’t just about owning a good camera. It’s about knowing how to use it.
When you understand lighting, composition, camera settings, and a few basics, your iPhone photos can look sharper, more detailed, and cinematic. In this guide, you’ll learn how to make iPhone photos look professional with some cool photography tips and tricks.
Table of Contents
- Understand Your iPhone Camera Lenses and How They Work
- 7 iPhone Camera Features That Make Photos Look Like DSLR
- 1. Use Portrait Mode Like a Pro
- 2. Shoot in ProRAW
- 3. Set Resolution and Format
- 4. Adjust Macro Controls
- 5. Use Night Mode for Low-Light Photography
- 6. Use Camera Controls and Photographic Styles
- 7. Take Action Photos in Burst Mode
- Pro Shooting Tips to Make Your iPhone Photos Look Professional
- 1. Master Composition
- 2. Lighting: The Secret to DSLR-Quality Photos
- 3. Shoot in Pro Mode Using Third-Party Apps
- 4. Keep Photos Sharp and Noise-Free
- How to Edit iPhone Photos for a DSLR-Style Finish
- Common iPhone Photography Mistakes That Ruin Photo Quality
- Final Thoughts
Understand Your iPhone Camera Lenses and How They Work
Most modern iPhones include three camera lenses, and each one serves a different purpose. Learning when to use them makes a huge difference.
The wide lens is the main camera. It usually performs best in most lighting conditions and captures the highest-quality images. If you’re unsure which lens to use, this is the safest choice.
The ultra-wide lens captures a larger field of view. It’s great for landscapes, buildings, and group shots. However, it can distort faces and objects near the edges of the frame, so it’s not ideal for portraits.
The telephoto lens is closest to DSLR portrait lenses. It compresses perspective and produces more natural background blur. This makes it ideal for portraits, street photography, and subject-focused images.
7 iPhone Camera Features That Make Photos Look Like DSLR
Apple has included several camera settings and features over the years that simulate professional camera behavior.
1. Use Portrait Mode Like a Pro
Portrait Mode is one of the most powerful tools for creating DSLR-style photos on iPhone. It simulates shallow depth of field, which keeps the subject sharp while blurring the background.
However, Portrait Mode works best when used correctly.
- Open the Camera app and swipe the Photo mode to the left. You will see Portrait.
- Make sure there is enough distance between the subject and the background. This helps the camera create a more natural blur.
- Tap the menu icon > Aperture to adjust background blur. Lower f-stop numbers increase blur, while higher numbers reduce it.
- Now, select a Portrait lighting mode. Choose the one according to the setup to produce more realistic results.
- Simply tap the shutter button to capture the image.

When used carefully, your iPhone Portrait Mode can produce images that look surprisingly close to DSLR effects. Always avoid overly complex backgrounds like messy hair or transparent objects, which can confuse the depth detection.
2. Shoot in ProRAW
ProRAW combines the flexibility of RAW photography with Apple’s computational photography. It’s available on iPhone 12 Pro and later Pro & Pro Max models.
ProRAW files are significantly different from JPEG or HEIC photos. They have a lot of image data, including highlights, shadows, and color detail. This means you can adjust exposure, recover blown-out skies, or brighten dark areas. The advantage is that ProRAW files retain quality when making these adjustments.
DSLR photographers shoot in RAW format for the same reason: it preserves detail and editing control.
To enable ProRAW on your iPhone,
- Go to Settings and select Camera > Formats.
- Here, toggle on ProRAW & Resolution Control.
- Then, in the Camera app, tap the RAW button before taking a shot.
ProRAW is especially useful for landscape photography, portraits in tricky lighting, night and low-light scenes, high-contrast environments, and photos you plan to edit in apps.
Keep in mind that ProRAW photos take up significantly more storage space (often 20–40 MB per image), so it’s best to use it when a photo really matters rather than for everyday snapshots.
3. Set Resolution and Format
Before you start taking photos or videos, it’s important to choose the right resolution and file format for your needs. These settings directly affect image quality, storage usage, and editing flexibility.
On iPhone, you can adjust these by following these steps:
- Go to Settings > Camera > Formats
- Select High Efficiency.
- Get back and tap Photo Mode.
- Set it on 24MP.
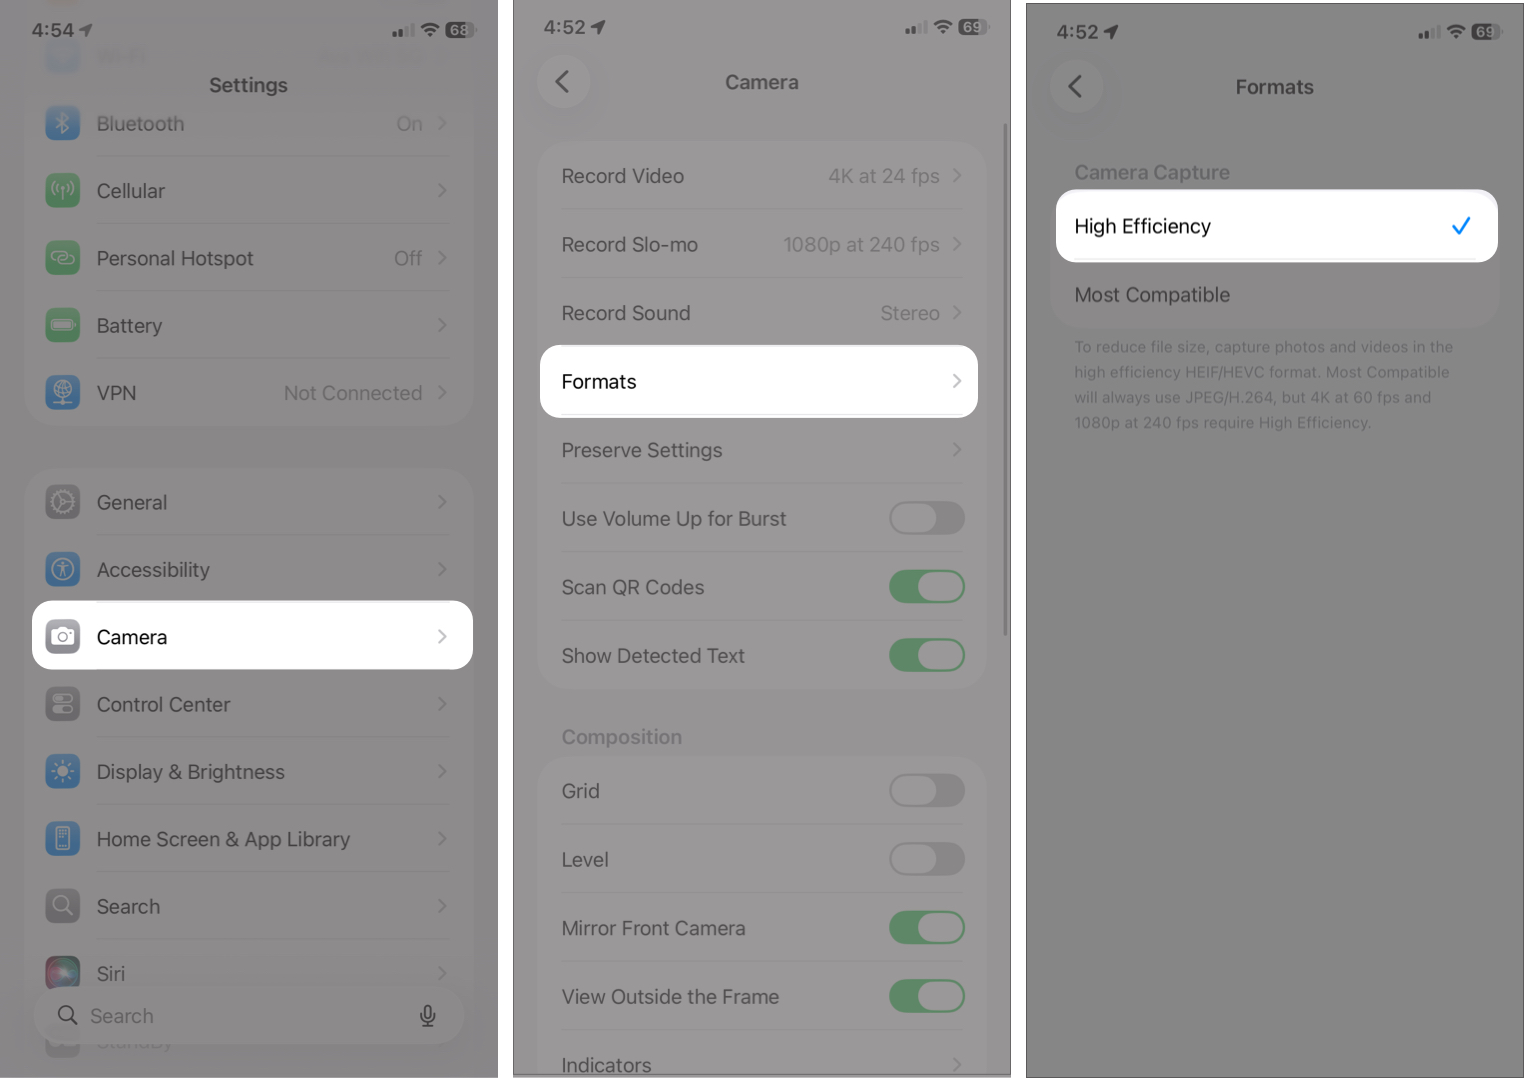
HEIF (High Efficiency Image Format) keeps excellent image quality while saving storage space. However, if you need better compatibility with editing software, you can switch to Most Compatible, which saves images as JPEG.
While at it, verify Smart HDR is enabled in the Camera Settings.
4. Adjust Macro Controls
Macro photography on iPhone lets you capture sharp, detailed images of subjects that are very close to the lens, like flowers, textures, insects, or small objects. On supported iPhone models, the camera automatically switches to the Ultra Wide lens when you move close to a subject.
While this automatic behavior is helpful, manually controlling Macro mode can give you more consistent and professional results.
To enable manual Macro control,
- Go to Settings → Camera and toggle on Macro Control.
- After enabling it, a small flower icon appears in the Camera app whenever the phone detects a close subject.
- You can tap this icon to turn Macro mode on or off.
Using the Macro control stops the lens from switching on its own and it helps you keep the framing of your pictures consistent.
Additionally, for best Macro results, keep your hands steady, make sure your subject is well-lit, and move slightly closer or farther away until the image becomes sharp. Even small adjustments in distance can make a big difference in focus.
5. Use Night Mode for Low-Light Photography
Shooting in low-light scenes? The Night Mode on iPhone can make a dramatic difference. It automatically activates in dark environments and uses longer exposure times plus computational processing to capture brighter, clearer, and more detailed photos.
When Night Mode turns on, you’ll see a moon icon in the Camera app with an exposure timer. You can tap it to manually adjust the exposure duration depending on how dark the scene is. Longer exposure times allow the camera to collect more light, improving detail and reducing noise.
For the best results:
- Keep your iPhone as still as possible
- Use a tripod or stable surface when available
- Avoid moving subjects during the exposure
- Let the camera finish processing before moving
Night Mode works especially well for city lights and streets at night, indoor scenes with dim lighting, evening portraits, and landscapes after sunset. It mimics long-exposure photography often done with DSLRs on tripods.
6. Use Camera Controls and Photographic Styles
To make your iPhone photos look more intentional and professional, take advantage of Camera controls and Photographic Styles in the latest iPhone 16 series.
In the Camera app, you can manually adjust settings like exposure, focus, and white balance using Camera Controls. If you’re used to shooting with a camera, this button provides a similar experience.
Photographic Styles allow you to customize the tone and color of your images while still preserving natural skin tones. Unlike filters, styles are applied intelligently during image processing, so they look more realistic and consistent across different lighting conditions.
You can set a Photographic Style by going to Settings > Camera > Photographic Styles, or by tapping the Photographic Styles icon in the Camera app. Common options include:
- Standard for natural results
- Rich Contrast for deeper shadows and stronger detail
- Vibrant for more saturated colors
- Warm or Cool for color temperature adjustments
If you want a consistent visual look across your photos, Photographic Styles can help you achieve that without needing heavy editing later.
7. Take Action Photos in Burst Mode
Capturing fast-moving subjects can be challenging, but Burst Mode makes it much easier to get the perfect shot. Instead of relying on a single photo, Burst Mode takes a rapid sequence of images so you can choose the sharpest and most dynamic moment later.
To use Burst Mode, simply swipe the shutter button to the left. The camera will continuously capture photos until you release the button.
Burst Mode is especially useful for:
- Sports and action scenes
- Kids and pets in motion
- Street photography
- Jump shots or moving vehicles
- Any unpredictable moment
After taking a burst, open the photo in the Photos app, tap Select, and choose the best frame from the sequence. You can keep your favorites and delete the rest to save storage.
Pro Shooting Tips to Make Your iPhone Photos Look Professional
Camera features are helpful, but photography fundamentals ultimately make the biggest difference.
1. Master Composition
When you have strong composition in a photo, it instantly makes the image look more professional.
- Start by enabling grid lines in camera settings. This helps you align subjects and keep horizons straight.
- Use the rule of thirds for more balanced images. Place your subject slightly off-center along grid lines.
- Framing techniques add depth by placing objects like windows, branches, or doorways around your subject.
You should also experiment with different shooting angles. Try shooting from lower angles, higher perspectives, or from the side. This way the pictures will look more dynamic.
Composition is one of the easiest ways to improve photography without buying anything.
2. Lighting: The Secret to DSLR-Quality Photos
Lighting has a bigger impact than camera hardware. Good lighting can transform even simple photos into professional-looking shots.
- You can use Studio Light effects in the camera to improve portrait brightness and contrast. When used subtly, this can mimic controlled lighting setups.
- Natural light usually produces the best results. Window light is soft and flattering, while golden-hour sunlight creates warm tones and gentle shadows.
- Artificial lighting can work well if it’s diffused and not too harsh.
- Avoid strong overhead light that creates dark shadows under the eyes and nose.
Placing light behind the subject can create dramatic and professional-looking images when exposure is adjusted properly.
3. Shoot in Pro Mode Using Third-Party Apps
The default camera app is powerful but still limited compared to DSLR controls.
Manual camera apps allow you to adjust:
- ISO
- Shutter speed
- White balance
- Manual focus
This gives you creative control over exposure and motion.
Learning manual photography settings takes practice, but it brings your iPhone photography closer to DSLR shooting.
4. Keep Photos Sharp and Noise-Free
Sharpness is essential for professional-looking photos.
- Stabilizing the phone using small accessories or even leaning against a wall can reduce blur.
- Using a tripod is especially helpful for night photography and long exposures.
- Avoid digital zoom, which lowers image quality. Instead, move closer or switch lenses.
Also remember to clean the camera lens regularly. Dust and fingerprints can reduce sharpness and contrast.
These small habits can significantly improve image clarity.
How to Edit iPhone Photos for a DSLR-Style Finish
Editing is where your photos truly come together. Even professional photographers rarely publish unedited images.
To edit photos on your iPhone:
- Open the Photos app and select the image.
- Tap the edit icon at the bottom menu bar.
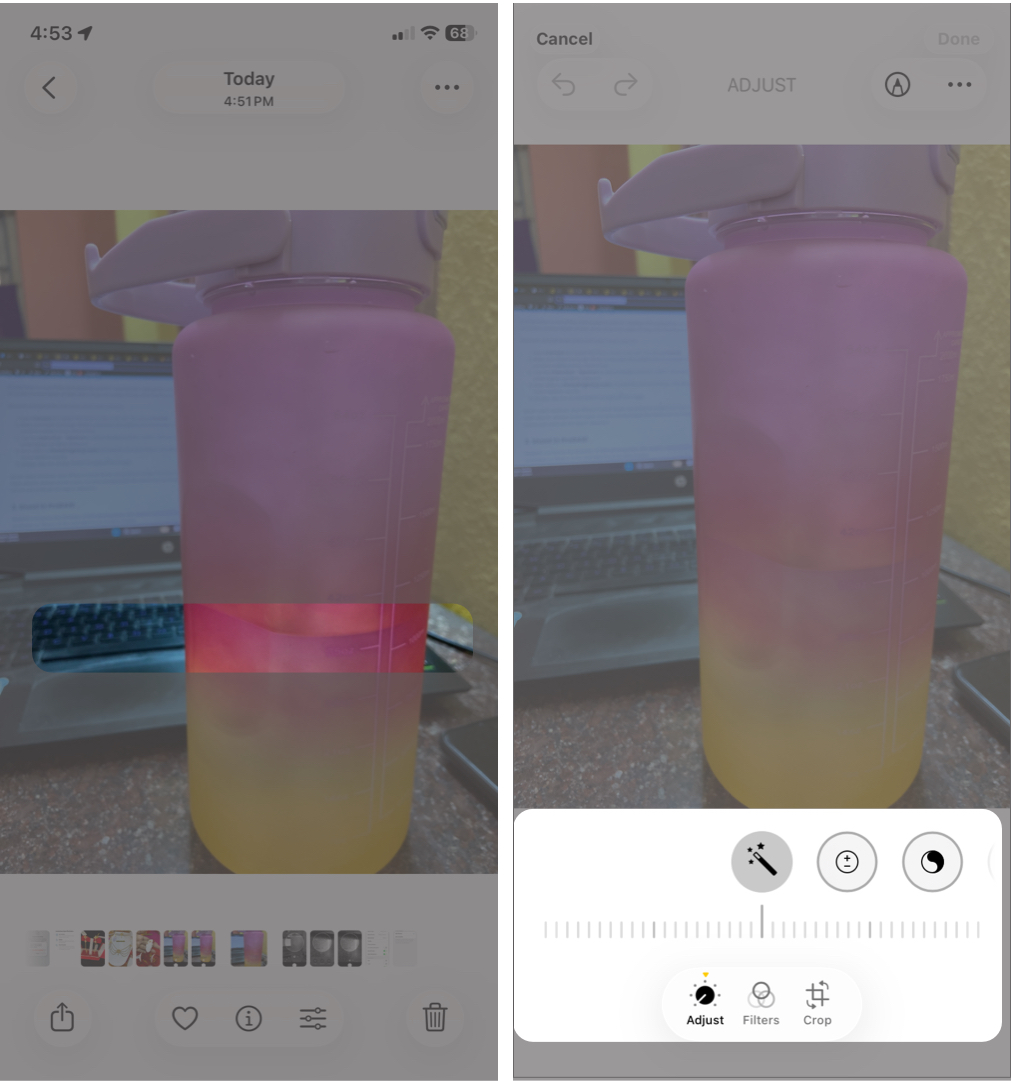
- Start with basic adjustments like exposure, contrast, highlights, shadows, and warmth.
- Lowering highlights can recover bright areas, while lifting shadows reveals detail in darker regions.
- Apply a filter if needed.
Having a recognizable style makes your photos look more professional. To do this, you can just copy the edits and paste them onto every single photo that you want to edit.
If you want to do more than basic editing, you can use other photo editing apps. These apps have presets and advanced tools that let you edit your photos manually.
Common iPhone Photography Mistakes That Ruin Photo Quality
Some habits can prevent iPhone photos from looking professional.
- Overusing HDR can make images look unnatural.
- Oversharpening during editing creates harsh textures.
- Using digital zoom reduces image quality.
- Shooting in poor lighting introduces noise and blur.
Avoiding these mistakes alone can noticeably improve your photos.
Final Thoughts
iPhone cameras are more powerful than ever, and the gap between smartphones and DSLRs continues to shrink. But great photography still depends on fundamentals like composition, lighting, timing, and practice.
When you combine these skills with iPhone camera features and manual controls, you can make photos look remarkably professional.
Start practicing. Experiment with light and angles, and refine your editing style. Over time, your photos will begin to look DSLR-like and social media ready.
About The Author