How to Scan Documents on iPhone Without a Scanner

Think you need a scanner? Nope, it’s already in your pocket. Your iPhone can scan paper documents and turn them into professional-looking, shareable PDFs in seconds. Thanks to some smart built-in tools from Apple, the entire process is surprisingly simple. No additional apps required.
In this guide, you’ll learn exactly how to scan documents on your iPhone, improve scan quality, add signatures, and fix common issues using simple steps.
Table of Contents
- What You Need Before Scanning Documents on iPhone
- Method 1: Scan Documents on iPhone Using the Notes App
- Method 2: Scan Documents on iPhone Using the Files App
- How to Edit Scanned Documents on iPhone
- How to Add a Signature to a Scanned Document on iPhone
- Best Scanner Apps for iPhone (Third-Party Options)
- Tips to Get the Best Scan Quality on iPhone
- Common iPhone Document Scanning Problems and Fixes
- Final Thoughts
What You Need Before Scanning Documents on iPhone
Before scanning, set yourself up for the best results. A tiny bit of prep makes a huge difference in quality.
- An iPhone running a recent version of Apple’s iOS.
- Good lighting (natural light is best).
- A flat surface to place your document.
- A clean camera lens (wipe it with a soft cloth).
That’s it. Whether it’s a last-minute form, an important receipt, a signed contract, or school notes, you can scan, edit, and send everything straight from your phone.
Method 1: Scan Documents on iPhone Using the Notes App
The Notes app on your iPhone is one of the easiest ways to scan documents and it’s completely free. You don’t need to install anything or create an account. The scanner is built right in and automatically turns your paper into a neat, cropped PDF.
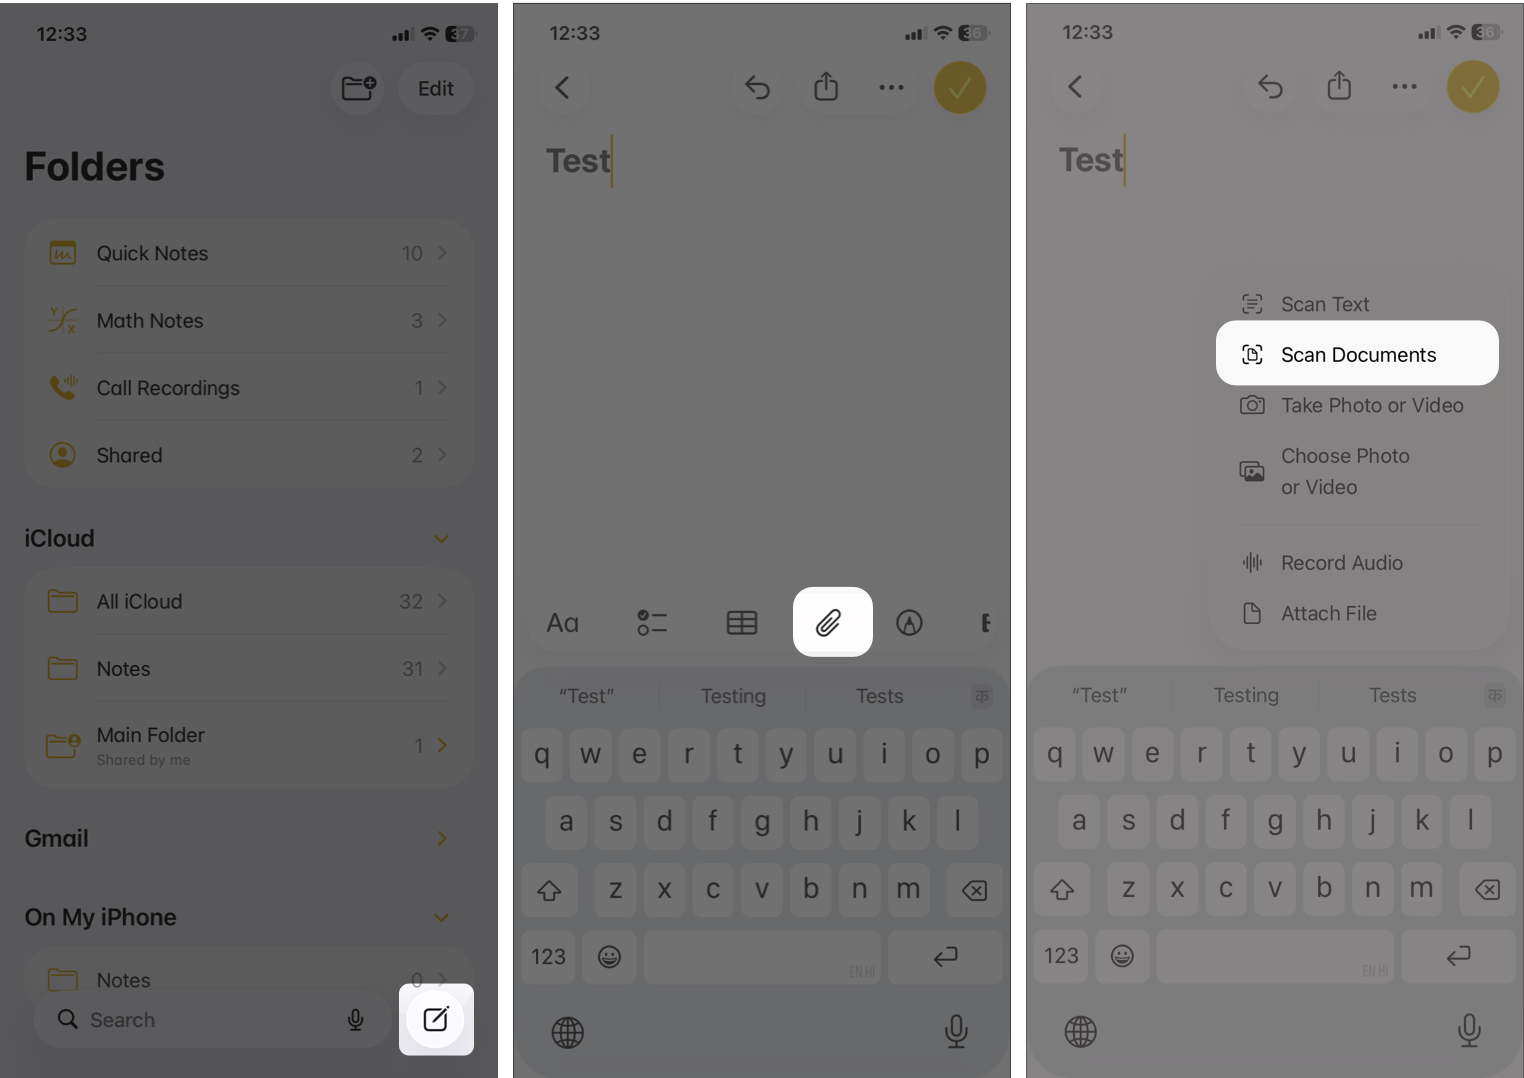
- Open the Notes app.
- Open an existing note or create a new one by tapping the pen icon.
- Tap the attachment icon above the keyboard.
- Choose Scan Documents from the options.
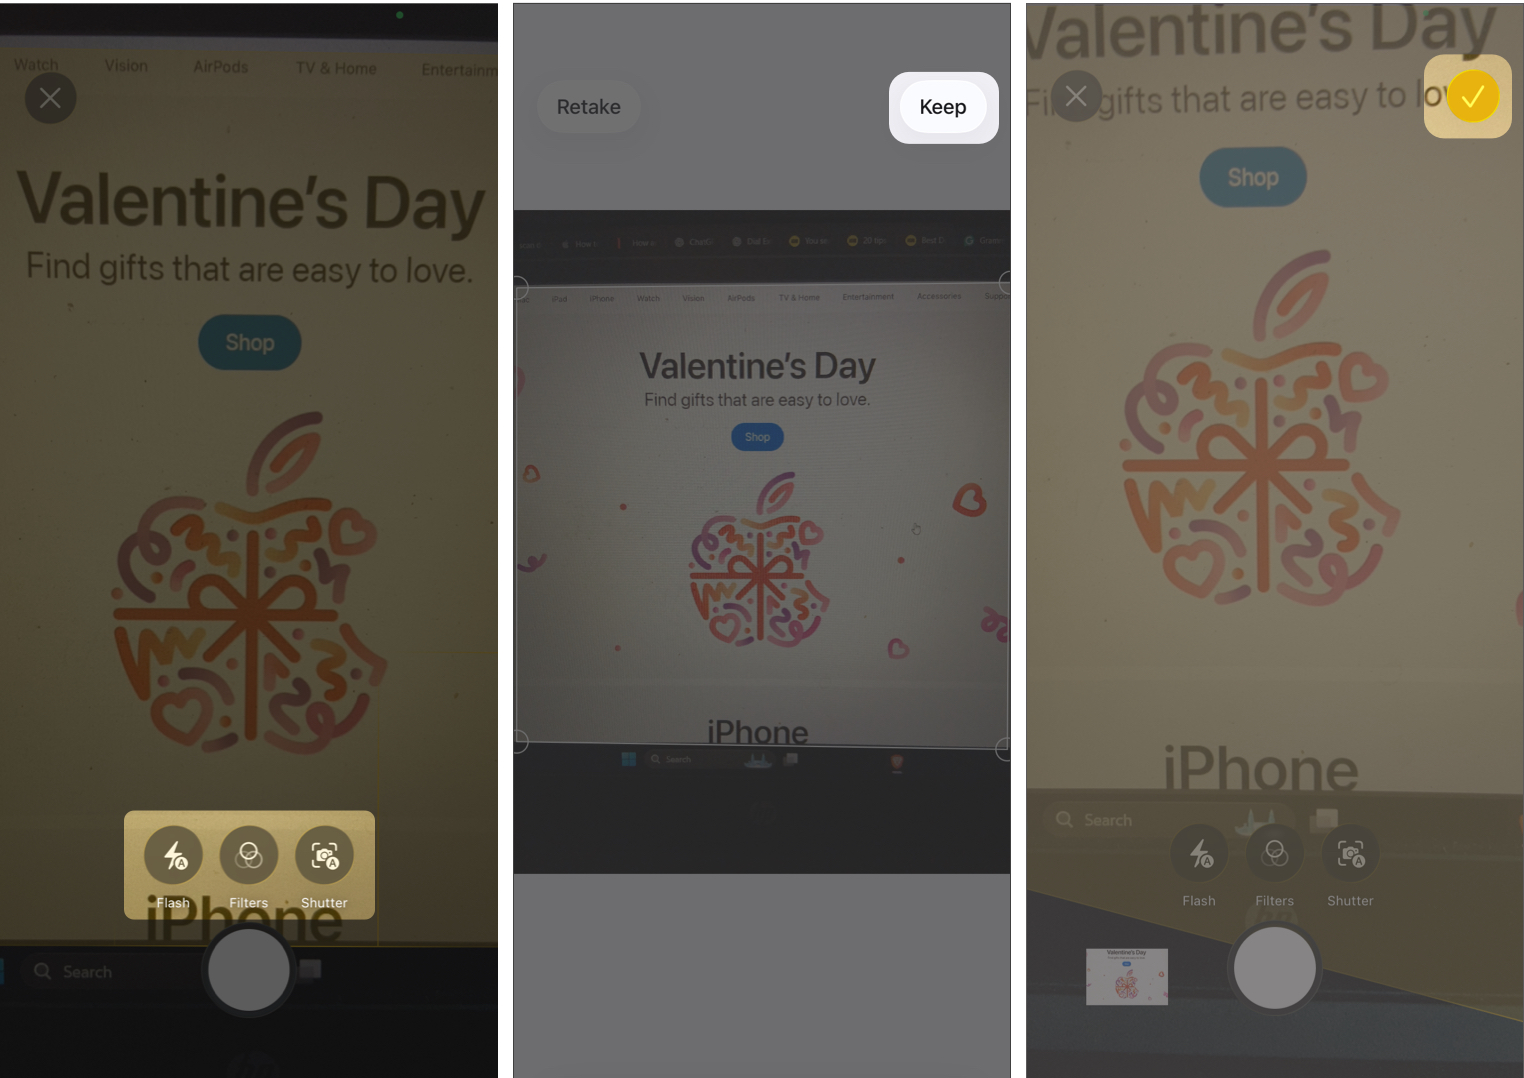
- Place your document on a flat surface and hold your iPhone over it. The app will auto-detect the edges.
- You can turn on flash or apply filters like Grayscale, Black & White, etc.
- It automatically captures the scan if Auto Shutter is enabled. Or you can press the shutter button to capture the document and crop it to your preference.
- Tap Keep at the top right corner to repeat for more pages. If you don’t like the scan, tap Retake.
- Finally, tap the checkmark to save the scans.
Your scan is now stored inside the note as a PDF. Now, you can tap the down arrow next to Scanned Documents and rename the PDF, send it via Mail, Messages, AirDrop, print it, or save it to Files.
Method 2: Scan Documents on iPhone Using the Files App
If you want the scanned file saved directly as a PDF in storage (instead of inside a note), use the Files app.
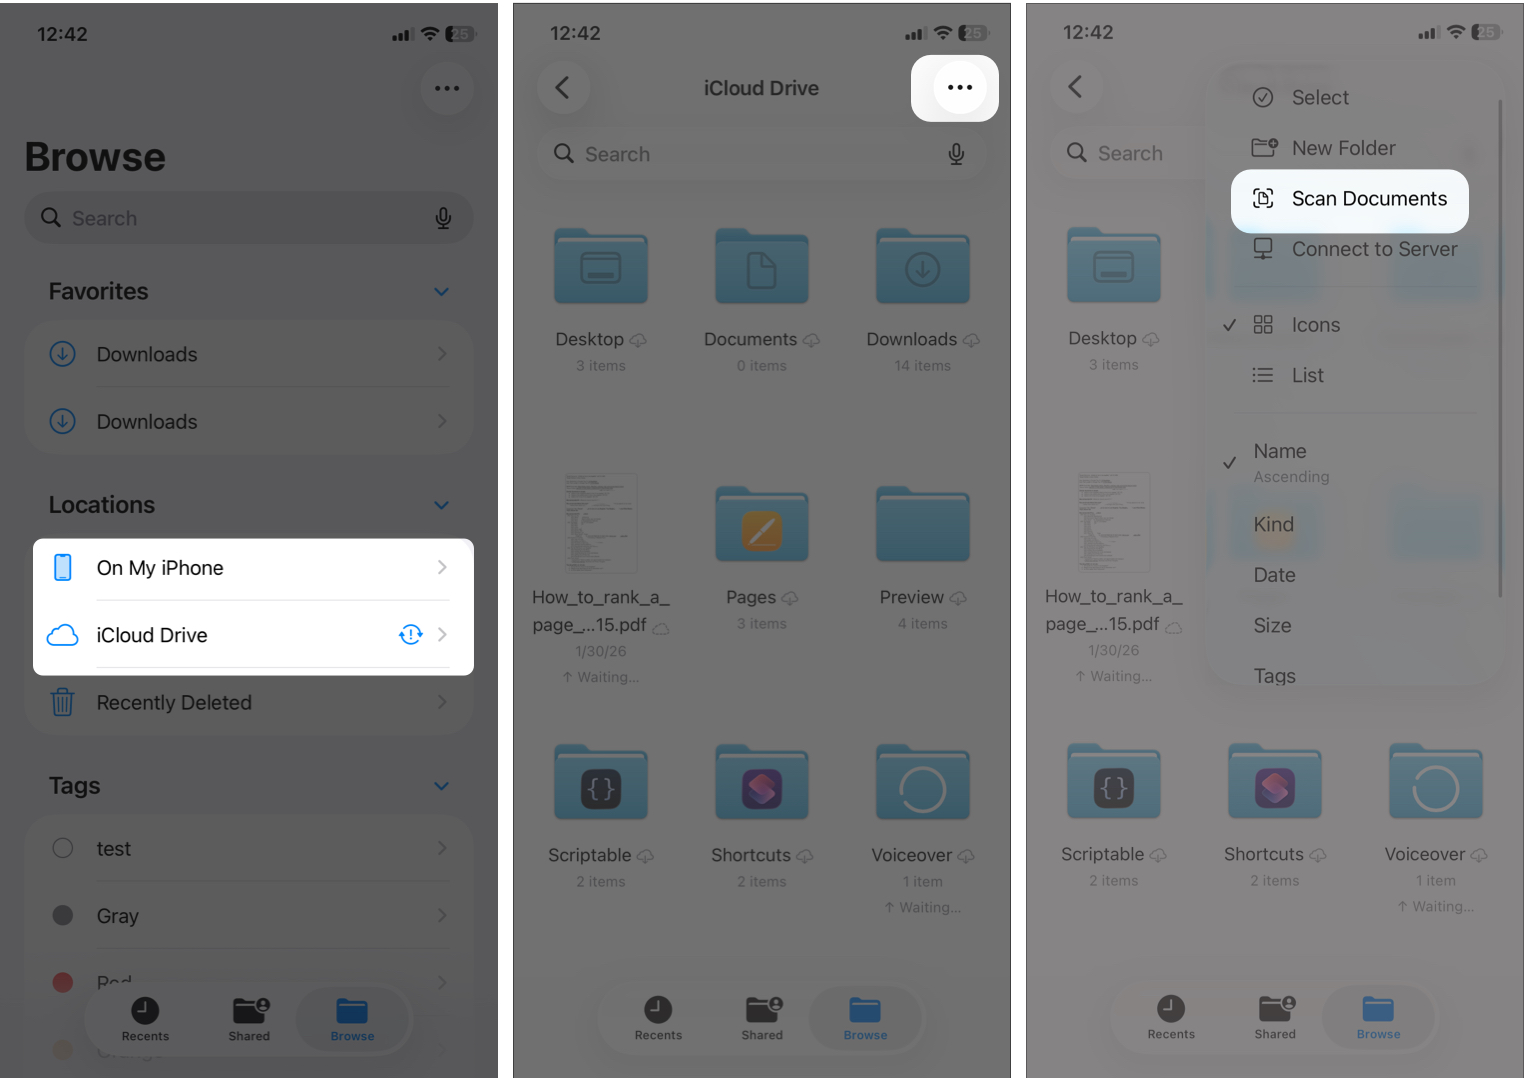
- Open the Files app and move to the Browse tab.
- Choose On My iPhone or iCloud Drive under Locations.
- Tap the three dots in the top-right corner.
- Choose Scan Documents.
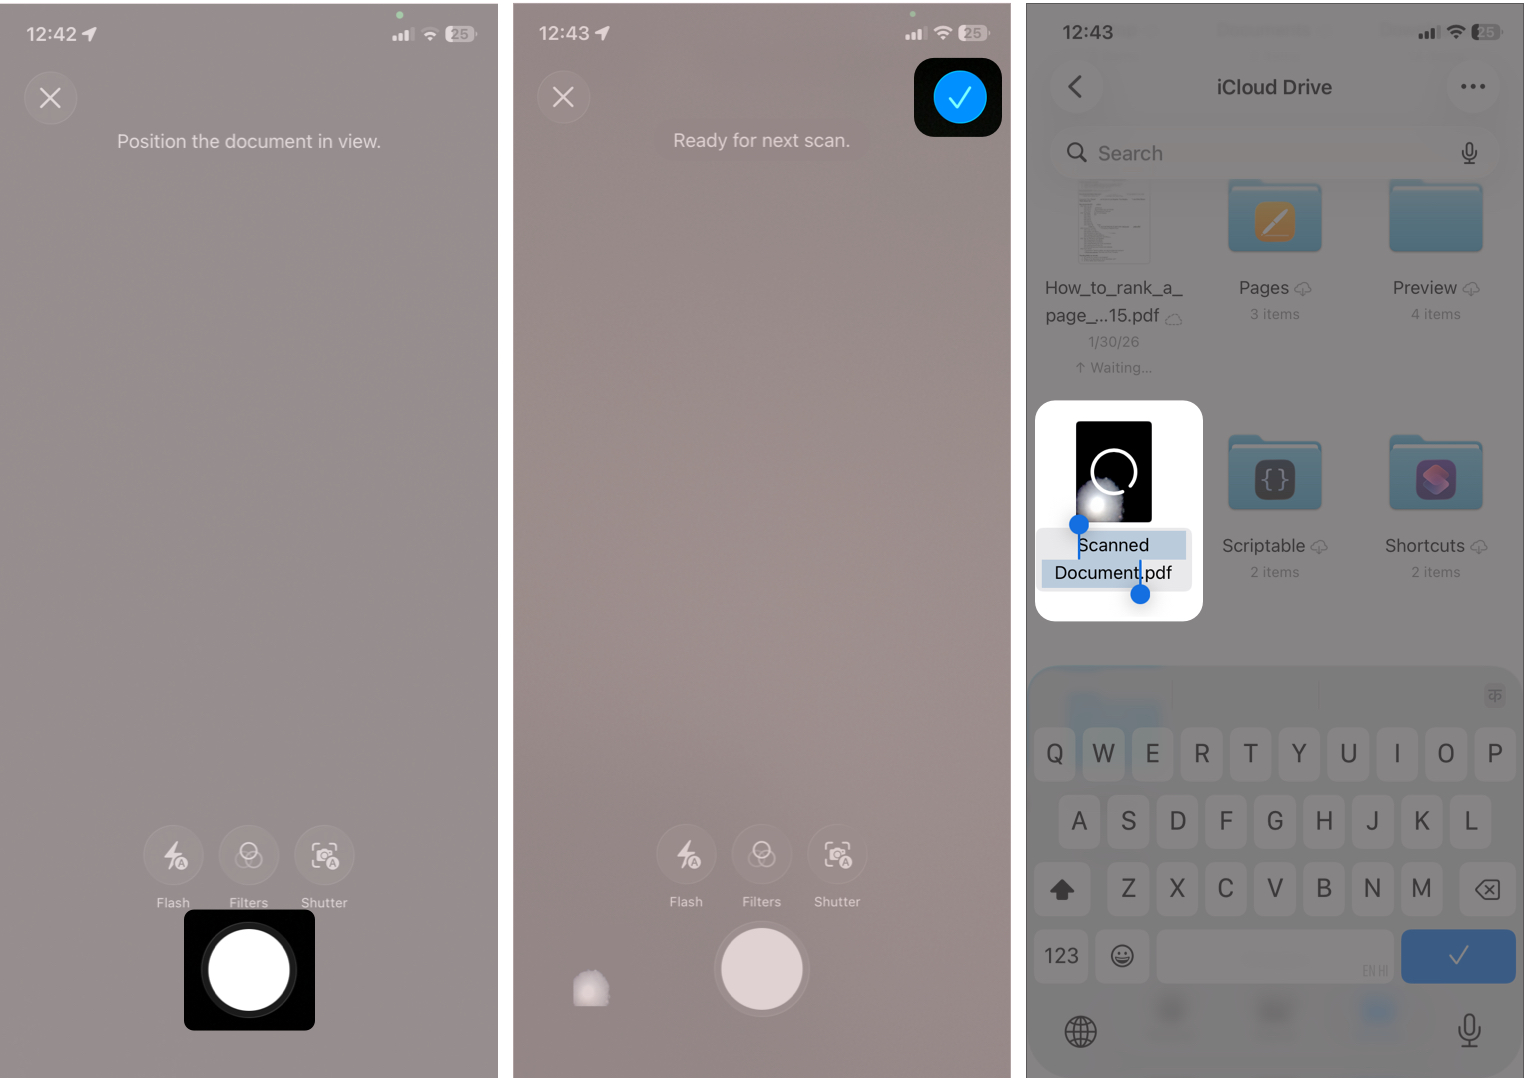
- Position the document in your camera view and tap the shutter button just like in Notes.
- Repeat scanning more pages and tap the checkmark button to save it.
- Name the file and choose where to store it.
Now you have a proper PDF file ready to upload anywhere.
How to Edit Scanned Documents on iPhone
After scanning, you’re not stuck with the first result. The iPhone gives you built-in editing tools. I’ll show you the steps using a scanned document in the Notes app.
- Open the note with the PDF.
- Tap the square icon next to the document name. It will show you all the scanned pages in the PDF.
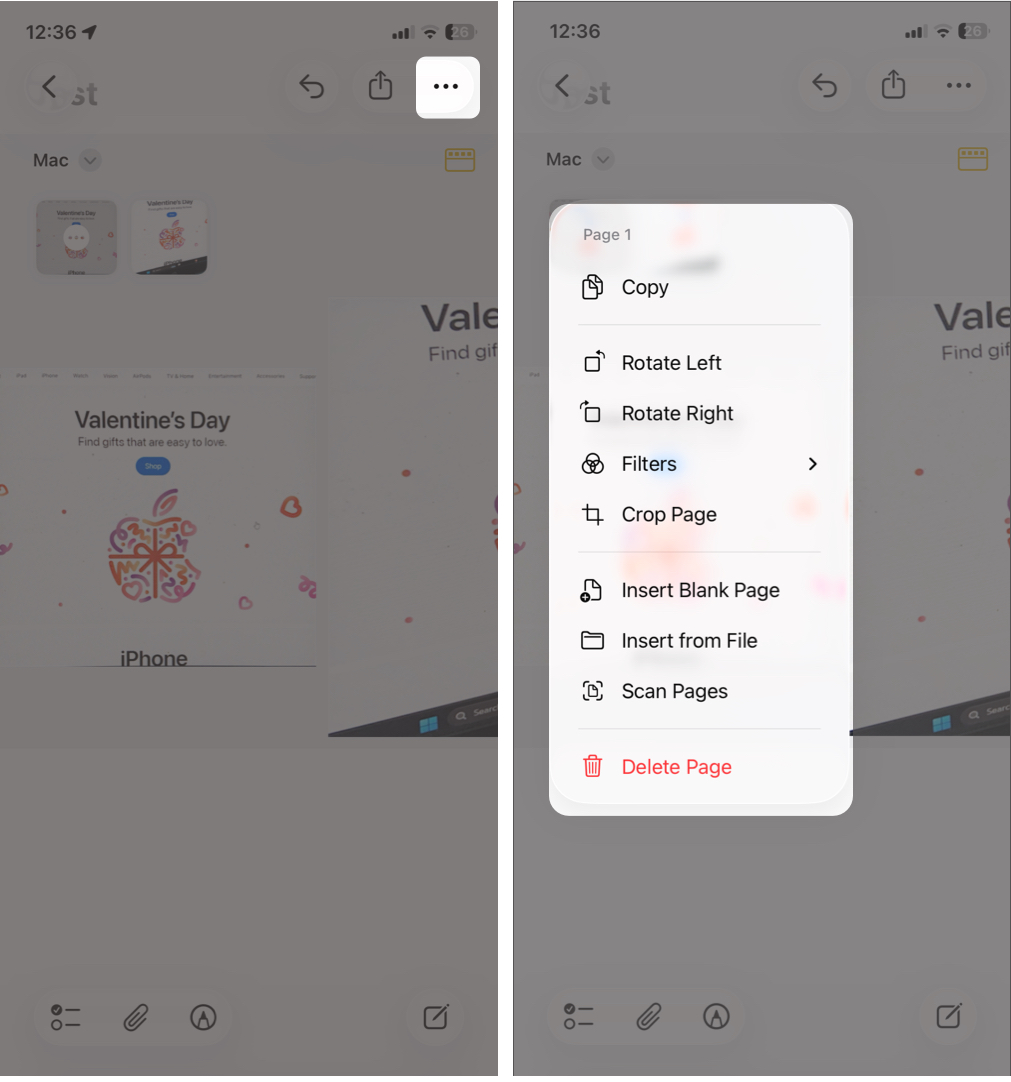
- Now, tap the three-dot icon on the page you want to edit.
- Rotate: Turn the page left or right.
- Crop Page: It will display the original page with cropping handles. Once done, tap the checkmark.
- Apply different filters: Switch between color, grayscale, black & white, or photo mode.
- Add more pages to an existing scan: You can insert a blank page, a document from Files, or scan new pages.
- Delete Page: Remove that specific page.
All changes update instantly and can be undone. So, don’t worry about accidental deletion.
Also Read: How to Edit a PDF on Your iPhone For Free
How to Add a Signature to a Scanned Document on iPhone
You can sign documents right on your iPhone, no printing needed.
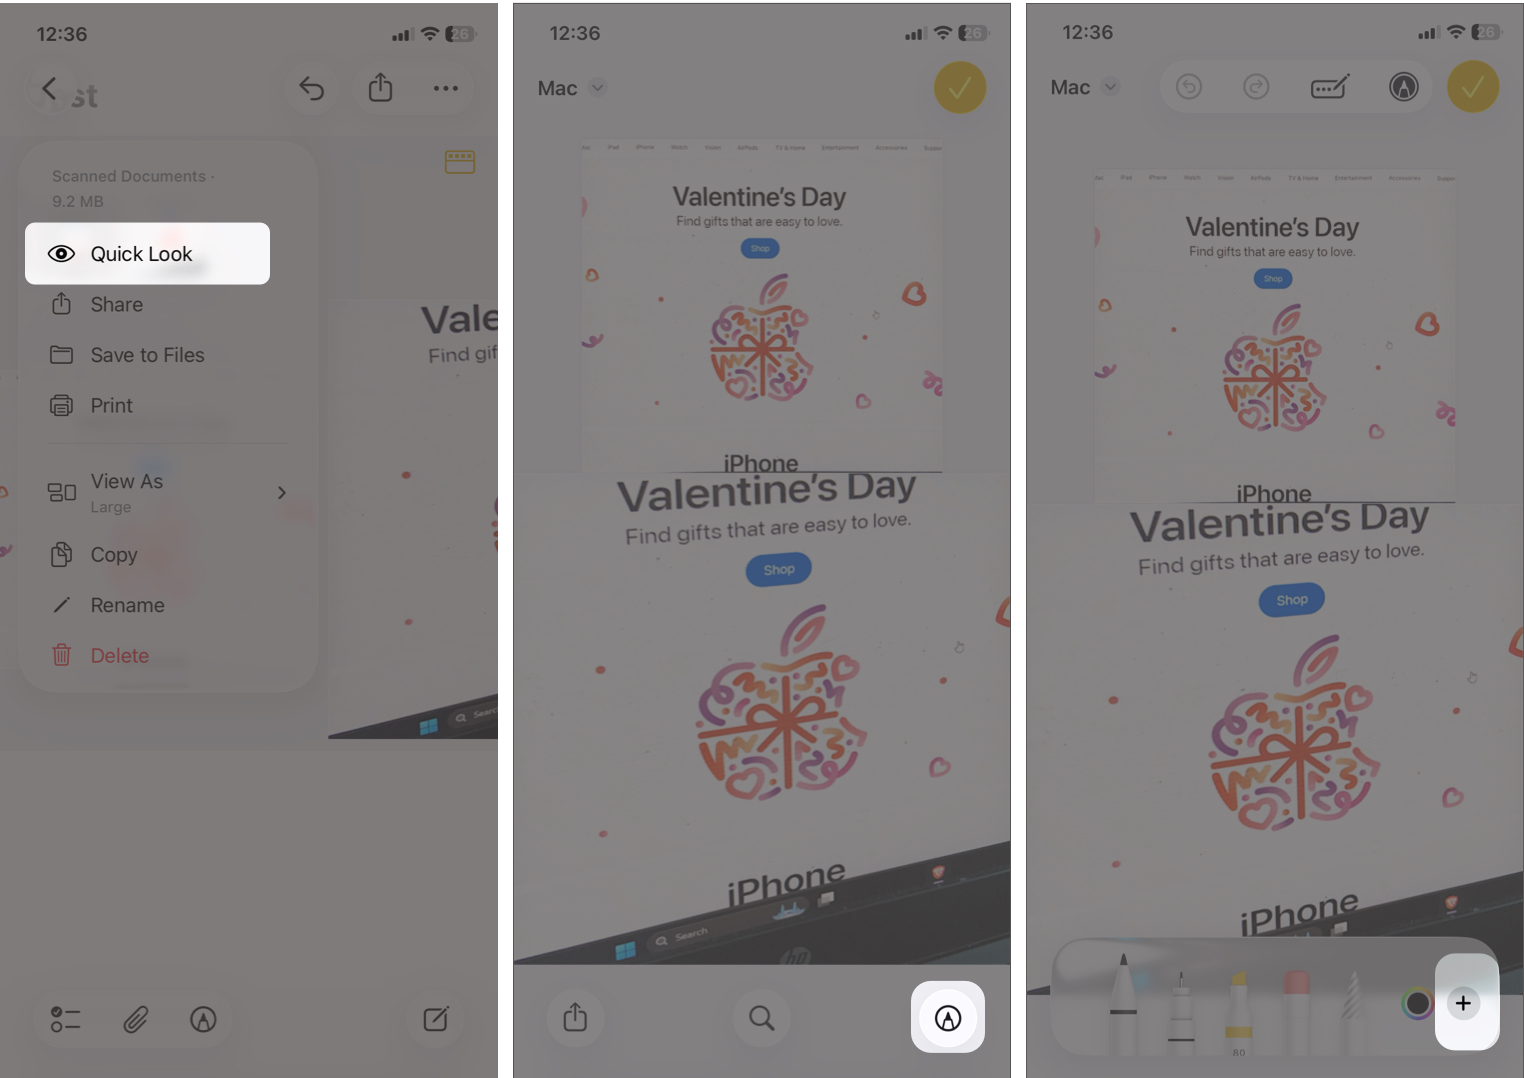
- Open the scanned document. In Notes, you need to tap the down arrow next to the document name and select Quick Look.
- Tap the Markup icon at the bottom right corner.
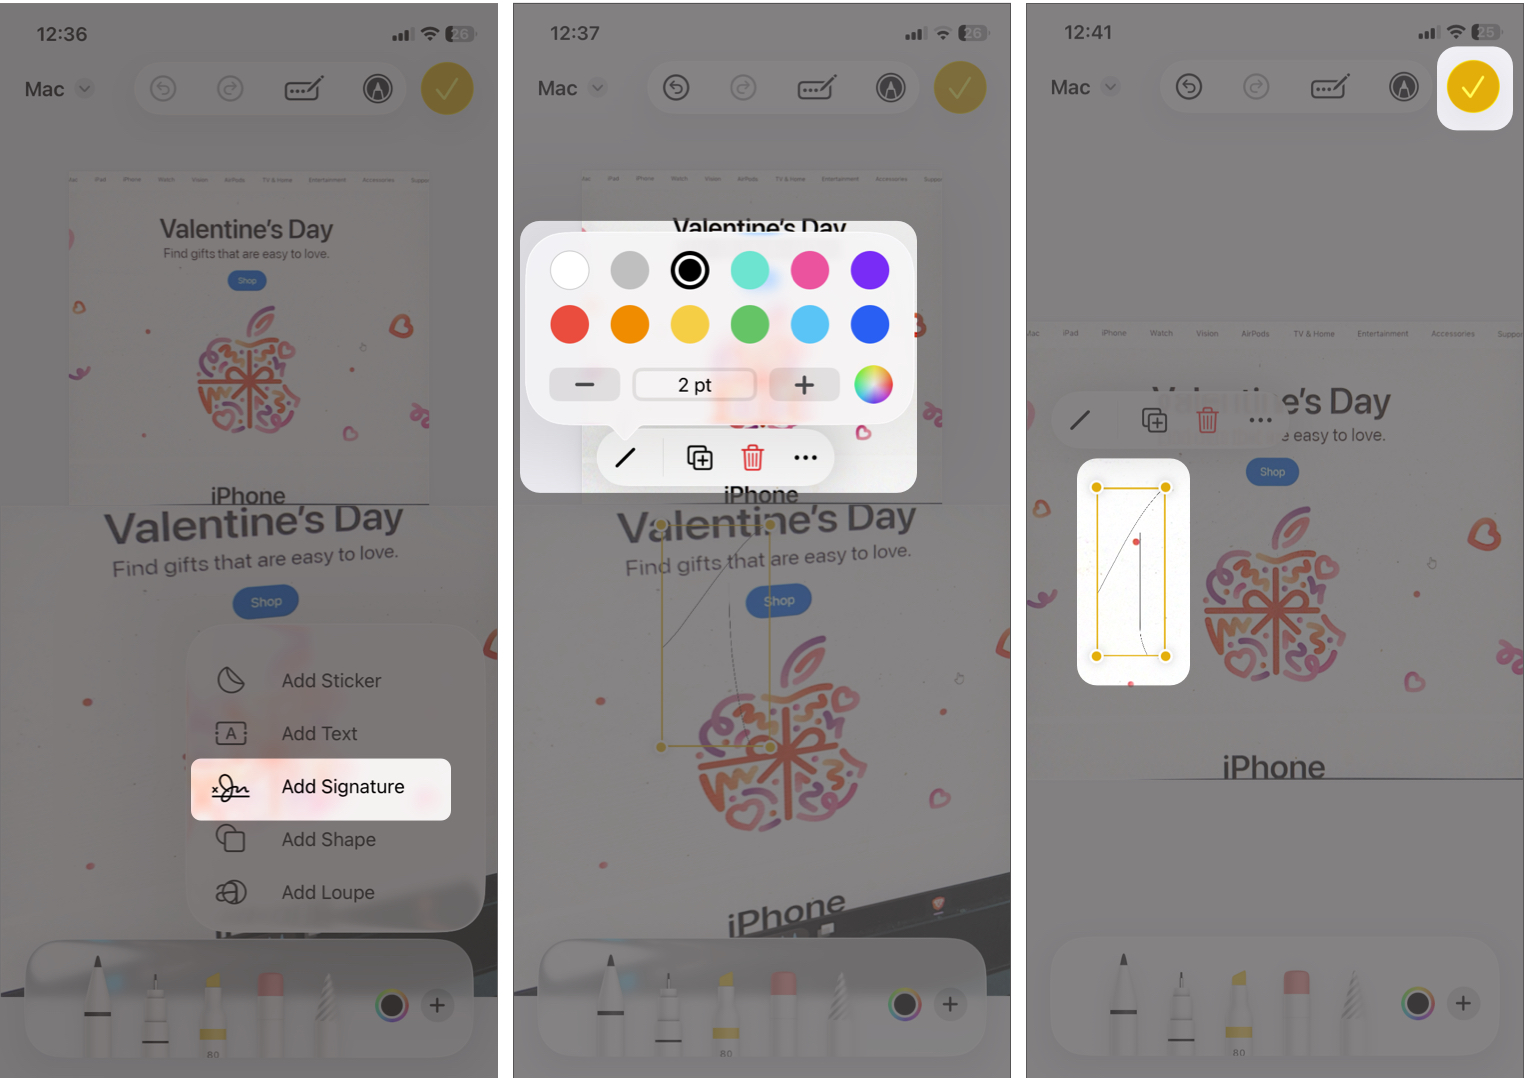
- Tap the + icon and select Add Signature.
- If you already have your signature saved, select it. Else, draw your signature with your finger and tap the checkmark to save it.
- Resize and place it where needed. You can increase the stroke width by tapping the line icon on the floating menu.
- Finally, tap the checkmark. If you don’t see it, tap the three-dot icon and select Done.
Your signed document is ready. Now, you can share it or get it printed.
Best Scanner Apps for iPhone (Third-Party Options)
The built-in tools are great, but sometimes you may want extra features like OCR text recognition, cloud sync with work tools, and advanced export options.
Popular third-party document scanning apps for iOS include:
- Adobe Scan: Excellent text recognition and clean PDFs. You can even clean up text from pages.
- Microsoft Lens: Great for handwritten notes, documents, whiteboards, and business cards.
Both are free with optional premium features.
Tips to Get the Best Scan Quality on iPhone
A few small tweaks can make your scans look professional.
- Use natural light and avoid strong shadows.
- Place white paper on a dark background for better contrast.
- Hold your phone directly above the document.
- Keep your hands and fingers out of frame.
- Flatten folded or wrinkled paper before scanning.
Common iPhone Document Scanning Problems and Fixes
| Issues | Solutions |
| Scan looks blurry | Clean your lens and hold the phone steady. |
| Edges aren’t detected properly | Adjust the corners manually before saving. |
| Scan looks too dark | Move to brighter light or switch filters. |
| PDF is too large to send | Use a third-party app to compress it. |
Final Thoughts
Scanning documents on your iPhone is one of those features that’s easy to overlook, but once you start using it, it quickly becomes essential. Whether you’re using the Notes app, the Files app, or a third-party scanner app, your iPhone has the capability to scan everything from receipts to important paperwork.
Try it once, and you might never go back to a traditional scanner again.
FAQs
Yes. Both Notes and Files allow you to add more pages before tapping the checkmark to create one multi-page PDF.
Yes, but for photos you may prefer the Photos app for better color accuracy. Later, you can convert the photos into a PDF. The scanner is optimized mainly for documents.
About The Author