How to use NameDrop in iOS 18 on iPhone
Of all Apple’s unique features, the one that caught everyone’s attention is NameDrop. It’s been my personal favorite since its launch in iOS 17. NameDrop lets you share contact information with just a tap of two iPhones. However, the feature is helpful only if you know how to use it. Keep reading to learn how to set up and use NameDrop in iOS 18.
Table of Content
- How NameDrop works on iPhone
- How to set up NameDrop in iOS 18
- Turn on or off NameDrop on your iPhone
- How to turn on name and photo sharing on iPhone
- How to use NameDrop on iPhone
- Video: NameDrop on iPhone: Myth vs. Fact & How to Use It!
How NameDrop works on iPhone
It’s important to note that it does not indiscriminately share contact details with every nearby iPhone and Apple Watch.
- For the data transmission to occur, the top ends of both iPhones must be near each other, utilizing near-field communication (NFC). NFC is designed for short-distance data transmission and requires a specific physical alignment.
- It’s also crucial to understand that NameDrop requires the device owner’s consent to operate. This consent-based mechanism ensures you can control who can access your contact details.
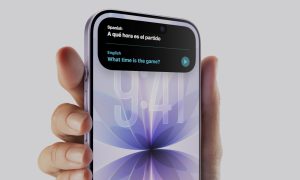
- When NameDrop is triggered through the proximity gesture, the user’s contact information appears on their own screen. This provides both users with two options: Share, allowing them to share their contact information with the other person, and Receive Only, which enables them to receive the other person’s contact card without sharing their own.
- NameDrop only facilitates sending and receiving new contacts. You can’t update your existing contact with this feature.
- Along with iPhone to iPhone transfer, you can share contact details from your iPhone to an Apple Watch running watchOS 10 and later.
- While your contact card could contain sensitive information like your name, email address, phone number, work and home address, picture, and birthday, users have complete control over the personal information they put on their contact cards.
This means you can decide which details to include in your contact poster, ensuring that only the information you are comfortable sharing is communicated via NameDrop.
As an added assurance, moving the devices away from each other or locking your device cancels the transfer process. So casually strolling with your phone in your pocket won’t likely lead to your contact card leaking without your consent.
How to set up NameDrop in iOS 18
To use NameDrop on iPhone, the participating devices must meet the following pre-requisites:
- As the feature was introduced in iOS 17, the devices must be running iOS 17 or later.
- Enable Wi-Fi, Bluetooth, and AirDrop on both devices.
- Both devices must be in close proximity to each other.
Further, to share contacts, you must enable NameDrop on your iPhone, and your Contact Cards should allow Name and Photo sharing. Here’s how you can do the same:
Turn on or off NameDrop on your iPhone
Though NameDrop is enabled by default, ensure to check this beforehand.
- Launch the Settings app on your iPhone.
- Go to General → AirDrop.
- Select Everyone for 10 Minutes.
- Now, simply toggle on Bringing Devices Together.

How to turn on name and photo sharing on iPhone
- Access the Phone app on your iPhone.
- Go to Contacts → User Card.
- Tap the Contact Photo & Poster menu.
- Enable the Name & Photo Sharing option.

How to use NameDrop on iPhone
- Bring the iPhone’s top closer to someone else’s iPhone or Apple Watch to share your contact details. You may even tap them lightly to trigger the feature.
- Unlock both devices.
- As the NameDrop feature activates, you will see a glowing animation and a profile on your screen.

- Now, you must select either the Receive Only or Share option from the interface.
If one user selects Share, the other user must select Receive Only. - That’s all you need to do to share contact cards!

- As you attempt this process again, you’ll see the AirDrop notification.

- Now, you will be redirected to the Contacts app. You will see their contact page filled with details. To change anything, tap Edit. Once satisfied, hit Done to save the contact.
Video: NameDrop on iPhone: Myth vs. Fact & How to Use It!
Share your details on the go!
I am sure you have already started exchanging contacts using NameDrop on your iPhone. If you face any other difficulty in the process, feel free to reach out to me in the comments below.
Read more:
- How to prepare your iPhone for iOS 18 update
- How to use Apple Check In in Messages app on iPhone
- How to use Smart Search Filters in Messages on iPhone
About The Author